Wednesday, June 27, 2012

Wave Your Sparklers America - You're Invited!


Each year we host a fun filled 4th of July party for our family and friends.  I really enjoy bringing a different level of excitement and creativity to an occasion, and hence over the years have been applying my event-styling whenever possible.


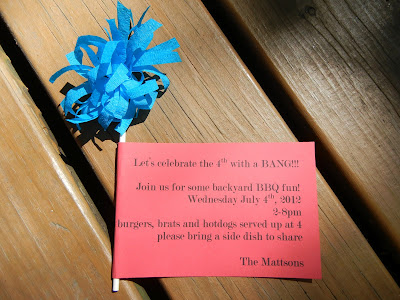
It's always a treat to have everyone over on the day we wish America a big Happy Birthday!  Over the years the kiddo count has gone from just a few to enough of 'em to staff a small department store.  Stars and Stripes forever!  This year I've created a fun invite to mail out to the crew which also includes a different kind of sparkler fun for the kiddos (and one that doesn't need to get to 1000 degrees to enjoy so it's a bit safer too:)  


I was inspired to do this as a result of viewing another blog - Oh Happy Day.  She made tassels out of crepe paper (which are adorable & not to mention the whole blog is pretty darn cool).  I decided to tweak it a little by scrunching, twisting, and gluing the tassels around a lollipop stick. Voila! Safe "sparkler" fun!


Supplies
  1. Cardstock 
  2. Crepe paper
  3. Lollipop stick
  4. Scissors
  5. Glue gun
  6. Printer


Instructions
  1. Click here to give you great instructions on creating the tassel.
  2. After you have the middle part twisted, scrunch the ends a bit to create a messy tassel. 
  3. Adults only - using your glue gun, put glue near the top of the lollipop stick - then quickly before the glue dries, take twisted middle part of the tassel and wrap it around the glue.
  4. If you are adding the invite, use more glue on the edge of the paper and attach to stick (see below). 
  5. Make another line of glue and then roll the paper over the lollipop stick (just a little).


If you are mailing the invites you will have to loosely and gently roll it around the stick to fit in your envelope (unless you use a full size envelope/package).

Remember to personalize your message on the card to make it your own. Have fun making them - your kiddos will be running from sea to shining sea with these flying in the air!  They are quite simple to make so I know you can do it!

Make it simple, make it fun, and make it with the kids!
      XOXO, Nicole


Saturday, June 16, 2012

Best Father's Day gift...time together with the kids.


It's Father's Day! While we could settle for giving dear old Dad a tie or even the big piece of chicken, there's an even better gift we can give him - quality time spent with his children!  As Ferris Bueller said: "Life move's pretty fast.  If you don't stop and look around, you could miss it."  So, what could be better than not only slowing down, but doing it with those oh so precious kiddos! 
Everyone always says "kids grow up so fast!"  So this year, my little girl is going to give her Daddy the gift of spending time together making some fun finger paint drawings.  Maybe your kids can do the same - it's fun and easy! 


Supplies:
  • Finger painting paper
  • Finger painting paint
  • Scissors
  • Construction paper
  • Markers


Instructions:
  1. Find a large surface to work on with either some newspaper or tablecloth just in case things get messy.
  2. Use the finger paint colors to create whatever drawings you desire.
  3. After the painting dries, you can make a frame by using construction paper as shown below for the card. 


Card to go with gift. Framed finger painting paper with message.


Now let's be honest, I am taking my husband out of his element for he doesn't share the passion for art that I do.  However, I know that once he sees the smile on his daughter’s face, that inner artistic creativity will emerge. J


With the same idea in mind the kids and I created another gift. This one is for Grandpa! He is a great cook and the kids are always watching him at work in the kitchen.  So we put together a homemade card which looks like a pot of soup and combined it with some noodles and a new soup ladle. It’s very simply put together with the purchase of a box of noodles and soup ladle. We use colored paper for the card and wrote a cute message. “Let’s stir up some soup together Grandpa - Happy Father’s Day!”


Keep in mind… first come up with the idea of what either Dad or the kids would enjoy doing together, then make a creative card to send your message. A nice touch might be a purchase of an item that goes along with your theme, but certainly not needed.  Maybe something related to fishing, biking, sports, or even just a book to name a few other ideas.  Whatever you come up with it is sure to be well received from any special Father’s Day recipient in your family.

~~~~~~~~~~~~~~~~~~~~~~~~~~~~~~~~~~~~~~~~~~


I could not let this post go without a sweet flying kite my son created, all on his own! It could be done as an invite for Daddy or Grandpa to fly the real thing with your kids. 


Supplies:
  • Construction paper
  • Yarn
  • Crepe paper
  • Markers
  • Scissors
  • Tape (oops, not shown)


Instructions
1.   Draw diamond kite shape and cut out. 
2.   Draw one large rectangle, two narrow rectangles and tape as shown.
3.   Use markers or crayons to decorate and write message.
4.   Tape yarn to the bottom of the kite and top of kite’s yarn spool.
5.   Tie the crepe paper around the yarn to create the bows.


Happy Father’s Day to everyone out there and for developing the minds of your growing children.

Make it simple, make it fun, and make it with the kids!
      XOXO, Nicole

Wednesday, May 9, 2012

Mother's Day Card for kids to give!


Mom - that three letter word that can mean so much to so many people so many times a day - EVERY day of the year.  Here's a fun craft that celebrates none other than... YOU!  And while we're at it, why don't we hand this one over to Dad so he can help the kids celebrate... YOU!

Use the template provided and have Dad and the kids create a 3-dimensional card of their own.  And who could forget Grandma?  After all, without Grandma we wouldn't have such great Mom's.  There just happens to be a Grandma template here as well.

Supplies:

  • Colored Paper to print the template(s)
  • Colored green paper for grass
  • Candy treat wrappers
  • Pipe cleaner
  • Photo or pom pom
  • Scissors
  • Glue
  • Crayons, colored pencils etc.


Instructions:
  1. Use 8 1/2 x 11 colored paper and printer to create MOM or GRANDMA card.
  2. You can access the template by clicking here (includes MOM and GRANDMA templates)
  3. Decorate the cover of the card however you would like using crayons, etc.
  4. Use your scissors and green paper to create  "1.5-inch high grass" for the interior of the card (if desired). Angle cuts half way down paper remove excess (See pictures below). Glue on inside of card at bottom.
  5. Write greeting on inside of card.
  6. Put a small amount of glue on the under side of the candy treat wrapper and place on cover of card.
  7. Put a small amount of glue on the back of a pom pom or photo and place  gently inside middle of wrapper. 
  8. Adult or older child will have to cut and bend pipe cleaner to make stem and leaves. Place glue on back side of stem and press gently and hold. Let dry. 
Angle cut grass for inside card.

Greeting written inside card.


Don't forget Grandma's card!!!

Keep in mind...there are options to make the card your own. As shown in the first photo, we printed MOM out on one colored paper, then cut it out with fancy scissors and glued it to another colored paper. Another idea shown below- add a photo. You can be as creative or as simple as you want. Let them use their imaginations!


Happy Mother's Day to all those Moms out there that make it happen! Hope you have a wonderful day with your family and friends!


Make it simple, make it fun, and make it with the kids!
      XOXO, Nicole


Mother's Day paper bouquet


Are you ready to treat Mom to a homemade bouquet of flowers? I hope so! This is so simple and creative that anyone would love to receive it. The kids will be so happy they made it (mostly) on their own.


Supplies: 
  • Pipe cleaner
  • Candy treat paper wrappers
  • Pom poms
  • Ribbon
  • Scissors
  • Glue


Instructions:
  1. Place glue on the inside of one candy wrapper. 
  2. Invert another wrapper and press it gently into the other wrapper on glue.
  3. Use scissors to make a small slit in middle bottom of wrapper.
  4. Take one pipe cleaner and poke end through hole of wrapper, twist to make sure it won't slide out. Repeat on other end.
  5. Put glue inside wrapper on twister pipe cleaner and press pom pom firmly. May have to hold for a little bit to secure.
  6. Let dry.
  7. Bend pipe cleaner and tie with ribbon.


Pretty simple with just a little help needed for the youngest kiddos.  The excitement on their face is so great to see - that they have made this gift with both love and their tiny hands.  


Keep in mind...if you don't have the candy size wrappers, try and use the cupcake wrappers.  It will work the same just a bit larger. You will need a larger size pom pom for the layout to work.  Or maybe you have something else in the house you could fill it with...crumbled tissue paper or maybe beads at the end of the pipe cleaner.  You could also put a photo of the kids in the flower as well.  (See post on Mothers day cards). 


Make it simple, make it fun, and make it with the kids!
      XOXO, Nicole


Sunday, April 22, 2012

Turtle time....


Hello Everyone!  Please forgive me for the absence - no good excuse other than good 'ole life getting busier by the day.  I am now; however, VERY ready and excited to share another fun, simple, and easy project for your kiddos!

First, I must say we don't have any pets (yet). If you don't have any either but are yearning for the next best thing, this cute, slow moving (and I mean reaaaaally slow :), super-easy to feed, and playful little companion might just be what the Dr. ordered. 

I got to thinking - "what can I make with all those fruit cups I have?"  Since Easter bunnies have essentially been put away after their season of hoppity fun, I somehow was reminded of the story of the Tortoise and the Hare.  In honor of the tortoise we made some turtles.  


Supplies
  • plastic fruit cup (e.g.  Dole or Del Monte, etc.)
  • green paper
  • 2 eyes
  • large green pom pom
  • 2 different shades of green paint
  • black paint (optional)
  • paint brush or foam brush
  • scissors
  • glue


Step 1
Paint one shade of green to cover the outside of the cup, let dry.


Step 2
Draw out 4 legs and a tail on green paper and cut out.


Step 3
Using the second shade of green make a pattern of spots, let dry.

Step 4
Once paint is dry, flip cup over & place a small line of glue for legs & tail on edge of cup. Press legs/tail on gently. Flip back over to dry.

Step 5
Place two drops of glue for eyes and more glue at the base & side of cup for head.  Let glue dry.

Keep in mind... it takes a little time for the coat of paint to dry (especially if it is put on thick) so you might want to have another short activity for the kiddos to do to help pass the drying time.

Remember to encourage your kids to be creative and see what fun they will have if you put out a few different colors. For example, perhaps Mrs. Turtle can have a green shell and pink spots for fun! Or perhaps a pink head to add to the green shell.  Let your kids use their imaginations!  We were going to use the black paint at the tip of his feet but time got the best of us and we don't have pictures here.  Don't let that stop you though - create away!


A few turtle feeding facts to share with the kids:
   Some of the things turtles eat are worms, snails, crickets, leafy vegetables
   including lettuce, turnip greens, green beans, beets, and carrots to name a
   few.  Fruits they love to chomp on include grapes, kiwi, mangoes, apples
   and bananas.  Lastly, turtles are very fond of flowers. You can feed them
   pansies, petunias or one of their sure-fire favorites of dandelions.  


Make it simple, make it fun, and make it with the kids!
      XOXO, Nicole


Wednesday, February 29, 2012

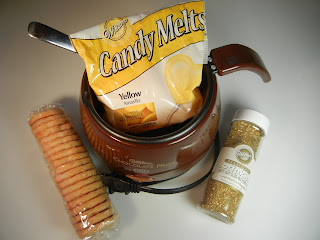
Leprechaun gold cookies!


With St. Patrick's day soon approaching, my son kept reminding me of how fun it was to search for the leprechaun gold in school last year. So, we decided to make some appropriately themed cookies to bring out our own pot of gold.  Your little leprechaun's will love making these tasty golden treats!  Although we're a few weeks away from the Chicago River turning green (isn't it pretty much green all year long?) it's never too early to plan.  After all, with kids the days and weeks just seem to fly on by, don't they?


Supplies:


Instructions:
  • Melt chocolate
  • Use the spoon to pour chocolate over a cookie 
  • Scatter the sprinkles to cover the cookie top & sides
  • Let dry flat
  • Repeat as desired

The kids will love helping to make these fun cookies for the whole family.  Have them shower the cookies with sprinkles. (Remember to cover the top and sides).  If you want to give these golden shimmering cookies as gifts, you can package them in a cellophane bag tied with a ribbon and a rainbow drawing from your kid(s).  After all, the gold can indeed be found at the end of a rainbow.  (And don't worry if the "real" leprechauns are shocked that you are giving away so freely these little pots of gold!)  


NOTE:  If your kids have food allergies, make sure to check the ingredients carefully for allergens and substitute as necessary


Make it simple, make it fun and make it with the kids!
      XOXO, Nicole


Sunday, February 12, 2012

Bowling anyone??


Surprise your kiddos with something fun and incredibly easy to make. For some good ole bowling fun, just print the file attached, grab some cardboard TP rolls, scissors, and a glue stick.  Within minutes they will have their very own set of bowling pins.  All you need to supply is a cushy ball and some  space for a bowling lane.  Strikes, spares, and an occasional gutter ball are sure to make this a smash! (and you don’t need to rent any fancy shoes :)

Supplies:

  • Paper for the printout
  • Cardboard toilet paper rolls
  • Scissors
  • Glue stick


Instructions:
  • Click on this file and print out as many copies as you need
  • Cut along the dotted lines
  • Spread glue to cover the entire TP roll
  • Wrap the cutout pin around TP roll, press gently 


Keep in mind...  have the kids help to make these super fun bowling pins and encourage them to put on their creative hats.  All kinds of different outcomes are possible - maybe they will color the pins various colors, or write numbers on each one, or put pictures of their friends on each pin for extra amusement.  Make as many bowling pins as you would like but if you must stick with tradition, remember a true bowling setup has 10 pins per lane.  (In our house, the traditional 10-pin setup only lasted so long until they were stacked and placed sideways on top of each other and then promptly knocked over again.)

Oh what fun these are for play dates and parties as well!


Make it simple, make it fun and make it with the kids!
      XOXO, Nicole


Sunday, February 5, 2012

Valentine flying arrow...


Look! It's a bird!  It’s a plane! No, it's a valentine arrow flying high in the sky!  And it’s showering everyone with friendship and love. 

For literally only pennies you can create this valentine card (and what can you create for just pennies these days?). Just follow the tutorial below and in no time you will have the cutest valentine that is sure to put smiles on anyone’s face!


Supplies
  • Colored paper
  • Pipe cleaner
  • Scissors
  • Crayon, marker 


Step 1
Cut out one large and medium size heart. Gently fold in half the large heart (the fold is straight up  and down - don't crease). Cut two small slits 1/2" apart, in the middle of the heart. Repeat with medium size heart.


Step 2
Make 3 small cuts at an angle in the medium size heart on each side. Be careful not to cut into the middle slits.


Step 3
Fold the pipe cleaner in half and cut. Take one piece and insert it in and under the two slits in the large heart. 

Step 4
Fold over a section of the pipe cleaner to secure to heart.

Step 5
Insert pipe cleaner the same way through the medium heart and fold over to secure.

Step 6
Decorate using your choice of markers, crayons, etc.


Have fun choosing who will receive each arrow!

Keep in mind... these are crafts for any age but I encourage the young ones to try and do as much of it as they can.  I know some adults might want to jump in, but give the kids a chance to build their gross motors skills.  It is projects like these that help in their development.  For the older ones consider using felt or ribbon to embellish the hearts a bit more.

Love to see what those little hands create! Send a pic to share via Facebook @ Nicole Mattson


As always, I would greatly appreciate any comments you have on this blog. Please tell me what you like, dislike, or even ideas that interest you.  I love to be challenged with creating something new.  


Make it simple, make it fun and make it with the kids!
         XOXO, Nicole


One more thing... Save those cardboard rolls from toilet paper.  I have something fun coming up for next week that will keep the kiddos busy for a while!