Monday, January 23, 2012

Butterflies and flowers make sweet Valentine treats.


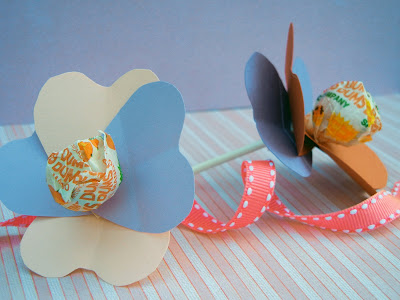
Flower Pops


Everyone loves getting flowers for Valentine's day-here's a bouquet they can eat! Hand-made heart petals around a lollipop center go together like hugs and kisses. This sweet treat is perfect for classmates, teachers and Grandma. 


Supplies

  • Colored paper
  • Scissors
  • Hole puncher
  • Lollipop
  • Tape 


Instructions
        
              1.  Draw 4, 2-inch hearts
              2.  Cut out (supervision needed for younger kiddos)
              3.  Align all hearts and punch a single hole near bottom 
              4.  Write a message on the hearts
              5.  Fold each in half lengthwise and open
              6.  Slip the lollipop stem through the holes
              7.  Open the heart petals and secure with piece of tape 


Keep in mind...this is a simple craft sure to give kids the joy of creating something from scratch. While drawing and cutting hearts is easy for you, it might take some practice for your little ones. Don't get hung up on perfection and feel the need to do every step for your child. Those odd-shaped hearts make each piece unique. So work together and have fun.


Butterfly Pop


Here is an original treat I created. Picture these flying around in all the kids' hands.   

Present this on its own or have it land on a green leaf (use green card stock paper). Message can read "Flying by to say Happy Valentine's Day! Your friend, [name]."


Supplies

  • Tulle ribbon 6-8" long
  • Pipe cleaner
  • Scissors
  • Lollipop


Instructions

  1. Cut tulle, wrap around lollipop neck and tie to make wings
  2. Fold pipe cleaner in half
  3. Wrap curve of pipe cleaner around neck of lollipop and twist tightly, repeat twice
  4. Curl pipe cleaner around tiny finger or pencil to make antennas

I hope some of these ideas might jump start you for Valentine's day! 

Keep in mind... make a list, gather or shop for supplies and have fun with the kids.  Another great idea is to have Grandparents or babysitters create with the kids. Have fun! 


Love to see what those little hands create! Send a pic to share via Facebook @ Nicole Mattson.


Make it simple, make it fun and make it with the kids!
        XOXO, Nicole


Tuesday, January 17, 2012

Valentine cards made with love and tiny hands.....

Heart Buddy Cards

Valentine's day is approaching and who doesn't like to be thought of?! Here are some fun ideas to make your child's Valentine extra special. Instead of buying character cards this year, this is a fun and easy way to create your own. It's simple and takes about 10 minutes!


Supplies
  • Colored paper
  • Googly eyes
  • Glue
  • Scissors
  • Popsicle stick
  • Marker


Instructions


             1.  Trace or draw 2 large 
                  hearts (body) & 2 tiny hearts (nose)
             2.  Cut them out. (Supervised if needed)
             3.  Glue on eyes/nose and draw face on one heart
             4.  Write message on second heart
             5.  Place the message side of heart-face down
             6.  Spread glue, place popsicle stick near 
                  bottom and take second heart with face 
                  side up and put on top of it  
             7.  Press gently and let dry

front
back
                   
Keep in mind... some kids might need a little help. The written message or smile might not be perfection, but that's okay - let them have fun! You will find if your children make these on their own, they will add unique creativity and character. See above. Put out some ribbon as perhaps they will add a hair bow or bow tie. Just remember the pride they will have in handing out cards they personally made!


Photo Valentine


Why not take a fun photo and give it some life with a lollipop treat in hand? It's easy to do! Be creative when having them pose... maybe have their hands above their head or have two kids hold their hands in the middle together. I am sure the fun will not only be making the card but coming up with the pose and then taking the photo!


Supplies

  • Photo
  • Colored paper
  • Scissors
  • Tape or Glue
  • Exacto knife
  • Lollipop


Instructions 

  1. Cut photo into desired shape
  2. Cut paper to frame photo
  3. Cut two slits half inch apart with exacto knife (adults) where the lollipop will be held
  4. Write message on back of paper
  5. Slide stick of lollipop through slits
  6. Tape or glue photo on plain side of paper


Keep in mind...everyone has creativity inside whether you believe so or not. Use my guide to unleash your inner craftiness by following the simple steps.


I would love to see what you come up with! Send me a photo of the kids making the cards and of their creations via Facebook @ Nicole Mattson.


Make it simple, make it fun, and make it with the kids!
        XOXO, Nicole