Wednesday, February 29, 2012

Leprechaun gold cookies!


With St. Patrick's day soon approaching, my son kept reminding me of how fun it was to search for the leprechaun gold in school last year. So, we decided to make some appropriately themed cookies to bring out our own pot of gold.  Your little leprechaun's will love making these tasty golden treats!  Although we're a few weeks away from the Chicago River turning green (isn't it pretty much green all year long?) it's never too early to plan.  After all, with kids the days and weeks just seem to fly on by, don't they?
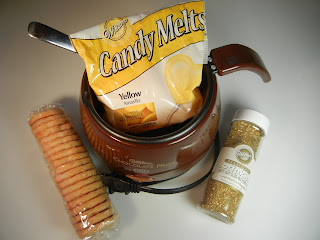


Supplies:


Instructions:
  • Melt chocolate
  • Use the spoon to pour chocolate over a cookie 
  • Scatter the sprinkles to cover the cookie top & sides
  • Let dry flat
  • Repeat as desired

The kids will love helping to make these fun cookies for the whole family.  Have them shower the cookies with sprinkles. (Remember to cover the top and sides).  If you want to give these golden shimmering cookies as gifts, you can package them in a cellophane bag tied with a ribbon and a rainbow drawing from your kid(s).  After all, the gold can indeed be found at the end of a rainbow.  (And don't worry if the "real" leprechauns are shocked that you are giving away so freely these little pots of gold!)  


NOTE:  If your kids have food allergies, make sure to check the ingredients carefully for allergens and substitute as necessary


Make it simple, make it fun and make it with the kids!
      XOXO, Nicole


Sunday, February 12, 2012

Bowling anyone??


Surprise your kiddos with something fun and incredibly easy to make. For some good ole bowling fun, just print the file attached, grab some cardboard TP rolls, scissors, and a glue stick.  Within minutes they will have their very own set of bowling pins.  All you need to supply is a cushy ball and some  space for a bowling lane.  Strikes, spares, and an occasional gutter ball are sure to make this a smash! (and you don’t need to rent any fancy shoes :)

Supplies:

  • Paper for the printout
  • Cardboard toilet paper rolls
  • Scissors
  • Glue stick


Instructions:
  • Click on this file and print out as many copies as you need
  • Cut along the dotted lines
  • Spread glue to cover the entire TP roll
  • Wrap the cutout pin around TP roll, press gently 


Keep in mind...  have the kids help to make these super fun bowling pins and encourage them to put on their creative hats.  All kinds of different outcomes are possible - maybe they will color the pins various colors, or write numbers on each one, or put pictures of their friends on each pin for extra amusement.  Make as many bowling pins as you would like but if you must stick with tradition, remember a true bowling setup has 10 pins per lane.  (In our house, the traditional 10-pin setup only lasted so long until they were stacked and placed sideways on top of each other and then promptly knocked over again.)

Oh what fun these are for play dates and parties as well!


Make it simple, make it fun and make it with the kids!
      XOXO, Nicole


Sunday, February 5, 2012

Valentine flying arrow...


Look! It's a bird!  It’s a plane! No, it's a valentine arrow flying high in the sky!  And it’s showering everyone with friendship and love. 

For literally only pennies you can create this valentine card (and what can you create for just pennies these days?). Just follow the tutorial below and in no time you will have the cutest valentine that is sure to put smiles on anyone’s face!


Supplies
  • Colored paper
  • Pipe cleaner
  • Scissors
  • Crayon, marker 


Step 1
Cut out one large and medium size heart. Gently fold in half the large heart (the fold is straight up  and down - don't crease). Cut two small slits 1/2" apart, in the middle of the heart. Repeat with medium size heart.


Step 2
Make 3 small cuts at an angle in the medium size heart on each side. Be careful not to cut into the middle slits.


Step 3
Fold the pipe cleaner in half and cut. Take one piece and insert it in and under the two slits in the large heart. 

Step 4
Fold over a section of the pipe cleaner to secure to heart.

Step 5
Insert pipe cleaner the same way through the medium heart and fold over to secure.

Step 6
Decorate using your choice of markers, crayons, etc.


Have fun choosing who will receive each arrow!

Keep in mind... these are crafts for any age but I encourage the young ones to try and do as much of it as they can.  I know some adults might want to jump in, but give the kids a chance to build their gross motors skills.  It is projects like these that help in their development.  For the older ones consider using felt or ribbon to embellish the hearts a bit more.

Love to see what those little hands create! Send a pic to share via Facebook @ Nicole Mattson


As always, I would greatly appreciate any comments you have on this blog. Please tell me what you like, dislike, or even ideas that interest you.  I love to be challenged with creating something new.  


Make it simple, make it fun and make it with the kids!
         XOXO, Nicole


One more thing... Save those cardboard rolls from toilet paper.  I have something fun coming up for next week that will keep the kiddos busy for a while!